The firmware files below comprise the compiled Serial-over-IP Tibbo BASIC application combined with TiOS, and are ready to run.
We offer many ready-to-use apps, among them a serial-over-IP (SoI) app and Modbus Gateway app.


You can also view our documentation online:
The firmware files below comprise the compiled Serial-over-IP Tibbo BASIC application combined with TiOS, and are ready to run.
There are two firmware builds — "R" and "D". Choose the right file depending on your device's model number.
The firmware below is for the following devices:
Choose the SN build if you are performing an upgrade through the serial port, and the S build if you're upgrading through the network.
Older devices: Tibbo no longer releases firmware upgrades for the EM100-00/-01/-02, or the DS100-00/-01/-02.

When equipped with the WA2000 Wi-Fi/BLE add-on, our EM2000, TPP2(G2), and TPP3(G2) now support over-the-air (OTA) firmware updates. This will only work if your EM2000, TPP2(G2), or TPP3(G2) is running the M/L V3.00B (or a later version).
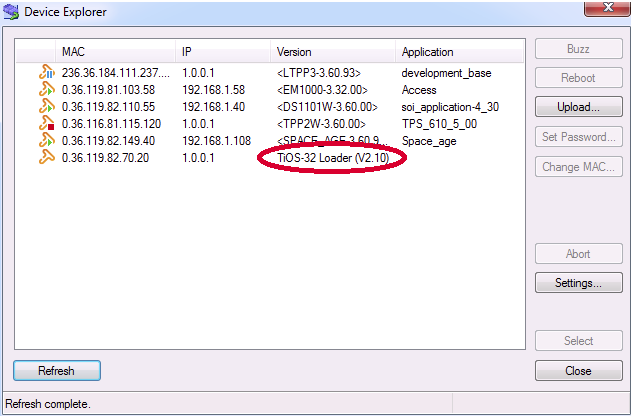
Here is how you can check your M/L version and update the M/L if needed.
Files listed below are packed all-in-one images: bootloader plus OS file system. During the production, these files are used as initial firmware image files. The image size is from 200~300MB.
The primary posting area for these files is the LTPS Firmware Images and Updates area in the LTPS File Collection Zone*. We recommend you to periodically check this location for the latest updates.
* More on this in the Firmware Updates section of the LTPS User Guide.
This file is an installation script. It is designed for Linux i586 hosts only. It contains a full set of cross-development tools, such as gcc, make, node, npm, development libs and headers, etc.
The installation of this script does not require root credentials. The script runs on any modern Linux distributions.
The primary posting area for these files is the LTPS Firmware Images and Updates area in the LTPS File Collection Zone*. We recommend you to periodically check this location for the latest updates.
* More on this in the Firmware Updates section of the LTPS User Guide.
VSPDL is distributed as a gzipped TAR archive and RPM package. System requirements and the installation procedure can be found here.
This release was tested in CentOS 6.3, Mandriva 2011, OpenSuse 12.1, OpenSuse 12.2, Debian 6.0.6, Ubuntu 12.04, and Mageia 4.5.
Note: you don't need x86_64 for now, it is binary-compatible.
# first: set up kernel headers for building modules
yum install kernel-devel
# second: install VSPDL RPM
yum install ./vspd-<version>.rpm

# Linux kernel development headers are installed into
# /usr/src/kernels/<somedir>
# preapre path for VSPDL
cd /usr/src/; ln -s ./kernels/<dirname> ./linux-`uname -r`
# STEP 1.0: install default kernel and reboot
yast -i kernel-default
reboot
# STEP 1.1: set up kernel sources for external modules
yast -i kernel-source
yast -i kernel-syms
# STEP 1.2: prepare linux source tree
cd /usr/src/
cp -f ./linux-obj/`uname -i`/default/.config ./linux/
cp -f ./linux-obj/`uname -i`/default/Module.symvers ./linux/
ln -s ./linux ./linux-`uname -r`
----------------- comment
# for my OpenSuse 12.1:
$ uname -a
Linux linux-wh6q 3.1.10-1.16-default #1 SMP Wed Jun 27 05:21:40 UTC 2012 (d016078) i686 i686 i386 GNU/Linux
$ ls -l
total 20
lrwxrwxrwx  1 root root   17 Jan 11 05:27 linux -> linux-3.1.10-1.16
drwxr-xr-x 24 root root 4096 Jan 11 07:40 linux-3.1.10-1.16
lrwxrwxrwx  1 root root   19 Jan 11 05:33 linux-3.1.10-1.16-default -> ./linux
drwxr-xr-x  3 root root 4096 Jan 11 05:31 linux-3.1.10-1.16-obj
drwxr-xr-x  3 root root 4096 Jan 11 05:31 linux-obj
drwxr-xr-x  8 root root 4096 Jan 10 09:30 packages
----------------- comment /
# STEP 1.3: finilize
cd /usr/src/linux/
make oldconfig && make modules_prepare

# STEP 2.0 install VSPDL RPM (or tar if you wish)
yast -i ./vspd-<version>.rpm

# STEP 3.0 install VSPDL
cd /usr/local/vspd-<version>-dist
./install.sh /usr/local/vspd

# STEP 4.0 (optional)
depmod
# STEP 1.0
apt-get install linux-headers-`uname -r`
apt-get install gcc
apt-get install make

# STEP 2.0
unpack and install vspd-<version>.tar.gz

# STEP 3.0 (for 64bit only)
# for 64bit system you may need to install lib32stdc++6:
apt-get install lib32stdc++
# STEP 1.0 (optional, usually it's already installed in Debian)
apt-get install linux-headers-`uname -r`
apt-get install gcc
apt-get install make

# STEP 2.0
unpack and install vspd-<version>.tar.gz

# STEP 3.0 (for 64bit only)
# for 64bit system you may need to install lib32stdc++6:
apt-get install lib32stdc++
# Mandriva 2011 placed it's development-ready kernel source into /usr/src/devel/linux-`uname -r`
# prepare system
urpmi kernel-(yourkernelname)-devel
cd /usr/src/devel/`uname -r`/
make oldconfig && make modules_prepare
# So you need to set up a symbolic link before running install.sh:

ln -s /usr/src/devel/`uname -r` /usr/src/linux-`uname -r`
# prepare system
urpmi kernel-(yourkernelname)-devel
cd /usr/src/devel/`uname -r`/
make oldconfig && make modules_prepare
# you need to set up a symbolic link before running install.sh:
ln -s /usr/src/devel/`uname -r` /usr/src/linux-`uname -r`
# need to install CURRENT kernel headers first:
pacman -S linux-headers

# choose the version that is the same to your current kernel.
# for example, Manjaro 20.2 is running on kernel-5.9.xxx, so choose linux59-headers

# need gcc and make too...
pacman -S gcc
pacman -S make

# create the standard path to kernel headers
ln -s /lib/modules/`uname -r`/build/ /usr/src/linux-headers-`uname -r | tr A-Z a-z`Our ARM-based Tibbo BASIC/C-programmable devices — EM2000, EM2001, TPP2(G2), and TPP3(G2) — support over-the-air (OTA) firmware updates*.
Two things are required for OTA updates to work:
The Monitor/Loader (M/L) is a resident firmware that is present on all Tibbo devices. The M/L V3.00B added support for Bluetooth Low Energy (BLE) OTA firmware updates. Many EM2000, TPP2(G2), and TPP3(G2) devices in the field were shipped prior to the release of the M/L V3.00B. To enjoy OTA firmware updates, you will need to update the M/L of your ARM-based Tibbo device as described below.
* OTA firmware update procedure is described in our TIDE, TiOS, Tibbo BASIC and Tibbo C Manual.
** "B" indicates that the M/L is BLE-enabled.

